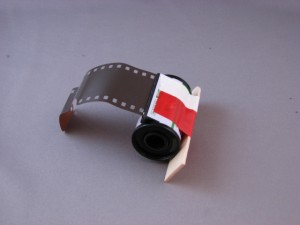
I have been exploring the possibility of using 35mm film in the Diana+. I'm not ready to post any results yet, but I did want to take a look at those kits that have been appearing on eBay.
I purchased one adapter kit. The item title was some variation of:
Capture 35mm With Your Diana,Diana+Etc Camera SHIP FREE
The kit came in a little box, which turned out to be hand-made out of a frozen swedish meatball dinner (box turned inward). The packaging seemed to be a little cellophane package that was stapled closed. It might have once held cookies. The "Kit" contents:
The adapter - a little bit of formed metal to hold the cassette
2 vinyl masks (probably 35 mm slide masks)
2 bits of tape to hold the mask in place.
Instructions
The masks are useless, since most 35mm users in Holgas or Dianas like to see image in the sprocket holes. If the sprocket holes are not desired, they can be cropped out. I suspect their purpose is to pad the contents of the kit. Without them, the kit would seem very light.
There was also a set of instructions which failed to indicate how far to wind the film after each frame. With 35mm film, you have no way of telling how far to advance the film, so this is an important piece of missing information.
I wrote the seller, who wrote back:
the 35mm film needs to be advanced same distance per frame as the 120 film for proper image captureThe other potential problem with this "kit", was that the metal cassette holder had double stick mounting tape, which meant that it's installation is more or less permanent. It doesn't say in the brief directions, but it might be possible to install this and still use 120 film with it. It might even provide the added benefit of keeping tension on the film roll.
I haven't had a chance to try and install it. I will only put this in my diana, if it looks like 120 film can still be used without having to remove it. I plan on checking this out this weekend, and will report on my findings.
I am also experimenting with alternative methods of using 35mm film, and will post those results as well, when I am done.
You should also check out my video of the adapter, Out of the "box":
/?p=146
 Tuesday, July 22, 2008 at 12:38AM
  kaiy |
  Post a Comment |
  Hello World
  Hello World
  Friday, July 18, 2008 at 3:40PM
  Diana+ Wide Angle and Close-up Kit,
  Lomo,
Lomo,  Lomography,
  Toy Camer in
  Video
Video  Wednesday, July 16, 2008 at 4:35PM
  35mm,
35mm,  Lomo,
Lomo,  Lomography,
  Pix Panorama,
  tip,
tip,  toy camera mod,
  trick in
  Average Cost,
  Hello World,
  Video
Video  Tuesday, July 15, 2008 at 7:19AM


 35mm film,
  Diana+,
  modification in
  Article,
  Diana Mod,
  Diana camera,
  Film,
Film,  Photo,
  Tech Tips
  Thursday, July 3, 2008 at 11:38AM
 Hello World