Powered by Squarespace
Contact

contact:

This form does not yet contain any fields.


    Entries in Diana+ (10)

    Sunday
    Nov222009

    Lo-Fi Holiday Gift Guide: 10 Gift ideas for the plastic camera photographer!

    Wondering what to get your lo-fi photographer? Here are a few of my favorite accessories and gift ideas.

    1. The Ultrapod Mini tripod

    This is a mini tripod that will easily stow anywhere without taking up too much room. It also has a handy velcro strap to attach to a railing or post for when you need a higher vantage point.

    Cost: $15

    Supplier:rei.com (http://www.rei.com/product/777249)

    If you need something that will also handle your DSLR, check out the slightly larger Ultrapod II.

    2. Holga Camera Diagram Placemats


    For a truly unusual gift for the unusual photographer, take a look at these hand drawn diagrams of the Holga printed on cloth placemats.

    supplier: http://papernstitch.com/product/holga-camera-diagram-placemats

    cost: $25

    3. A Fine Art Holga print from Holgajen

    For any photographer, it's inspiring to hang really beautiful work on your walls. Run on over to Etsy.com and check out HolgaJen's work.

    Supplier: http://www.etsy.com/shop/HolgaJen

    Cost: Varies: $15-$50

    4. Lomo Camera Keychains


    These cute little keychains come in 4 flavors: the Diana+, Lubitel+, Fisheye2 or the Lomo LC-A+.

    Supplier: http://lomography.com

    Cost: $7

    5. The Superheadz Black Slim Devil


    Based on the popular 35mm Vivitar Ultra Wide and Slim, this little camera can create some interesting photos. With it's wider than average 22mm lens, it has nice vignetting on the corners of it's images. It's a real bargain at $30.

    Suppliers:

    Fourcorners Store - http://www.fourcornerstore.com/collections/frontpage/products/black-slim-devil

    Freestyle Photo Supply Store - http://www.freestylephoto.biz/30242-Black-Slim-Devil-Ultra-Wide-Angle-22mm-35mm-Camera?cat_id=2201

    Cost: $30

    6. Fingerless gloves


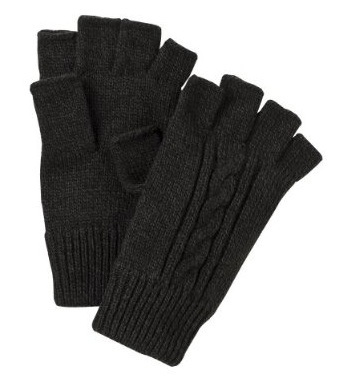
    It's wintertime, and if you spend anytime shooting outdoors, you know how hard it is to adjust the settings on your camera and wind the film without having to take your gloves on and off. Fingerless gloves are a great solution.

    There are several different varieties. Fingerless, fingerless with mittenlike finger covering. Check them out at:

    Target.com -

    JCPenney.com

    Cost: $15-$30

    7. Magnetic Photo Rope


    A fun way of displaying all those photos you have squirreled away in boxes under your bed! From the folks at Photojojo, one of my favorite photo websites. While you are over there, check them out and sign up. They have lots of good photo tips and projects.

    Supplier: Photo Jojo http://photojojo.com/store/awesomeness/magnetic-photo-rope

    Cost: $12

    8. Plastic Cameras: Toying with Creativity Book


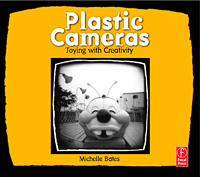
    The toy camera book by photographer Michelle Bates is a wonderful resource for all toy camera enthusiasts.

    Supplier: Amazon.com http://www.amazon.com/Plastic-Cameras-Creativity-Michelle-Bates/dp/0240808401/ref=sr_1_1?ie=UTF8&s=books&qid=1258880176&sr=8-1

    Cost: $20

    9. Holga Skins


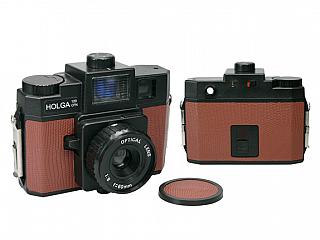
    This is a cool way to really make the Holga stand out from the crowd. There are 3 different skins you can buy to dress up your Holga. Chestnut, White Porcelain and Snake Skin.

    Supplier: Freestyle Photo Supply: http://www.freestylephoto.biz/644472-Holga-Skin-Chestnut

    Cost: $20

    10. Film Changing Bag

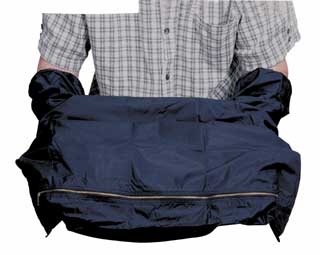
    This is another accessory that you don't realize how useful it is until you need one. When you get a film jam or need to unload your DIY 35mm film solution from your 120 film camera, you need a film changing bag. This one from Freestyle Photo Supply is especially nice because it is big, which gives you more room to maneuver in.

    Cost: $22

    Supplier: Freestyle Photo Supply - http://www.freestylephoto.biz/322730-Arista-Changing-Bag-27-in.-x-30-in.

    Saturday
    Jul112009

    Diana+ vs. Holga or Which camera should I buy?

    There is a comprehensive comparison on the blog posted here:

    http://www.dianacamera.com/blog/2007/12/18/holga-camera-vs-diana-camera.html

    The Diana+ is a more flexible camera, having more controls (3 f-stops + Pinhole aperture vs 1 aperture). The Diana+ also has the albility to change lenses. Currently, Lomography offers 4 additional lens.

    The Holga, on the other hand, is a very solidly built camera, and while not being as flexible, is still a very capable camera. It will take photos that equal that of the Diana.

    Which should you get? I usually like to recommend the Holga 120N or 120FN for beginners.

    Why? It's a cheaper and simpler camera to learn with. If you get this camera it keeps the cost of exploring toy camera photography on the cheap side. If it turns out that toy camera photography is your passion, then you can explore getting the Diana+.

    Let's look at the cost:
    Holga 120N - $28 (no flash, but with a hotshoe)
    Holga 120FN - $35 (built-in flash)

    Diana+ - $50 (no flash, no hotshoe)
    DianaF+ - $100 (comes with electronic flash attachment and hotshoe accessory)

    Sample Photos:
    Holga
    http://www.flickr.com/groups/86881528@N00/

    Diana+ DIanaF+
    http://www.flickr.com/groups/diana_plus/

    One of the main things you are going to have to figure out, is whether or not you have the patience and temperment to work with a film camera. Working with film, there is no instant feedback from a LCD screen, and you won't be able to delete your mistakes and forget about them.

    On top of that, 120 film is a little more difficult to deal with than 35mm film, since there are fewer labs that can process it. Ask around at your local Walmart, Costco or other 1-hour labs. While they may not be able to process the film on site, many of these labs will send the film out to be processed for you.

    The next option is to find a local pro-lab. These are labs that specifically cater to professional photographers and will be able to process your film on site. As you might imagine, it can be a little pricey.

    Another film processing option is to send out the film to be processed. Check out these processors, they both offer processing by mail:
    http://www.dwaynesphoto.com/
    http://www.swanphotolabs.com/swan08/index.php

    Then the best of all option, process the film yourself. BW film processing and even color processing are not too difficult to learn and also not very expensive to get into.

    If you think that 120 film is too much trouble, you can try a 35mm camera, like the Holga 135BC or the Superheadz Black Slim Devil or White Slim Angel.

    The Holga 120N or 120CFN (120 format) or the 35mm Holga 135BC, or Superheadz Slim cameras can be found at Freestyle Photo supply:
    http://freestylephoto.biz/

    The Diana+ cameras can be found at some stores like Urban Outfitters, or online at http://lomography.com

    Whichever camera you choose, remember that the point of lo-fi photography is to have fun and don't sweat the details!

    Friday
    Jul032009

    Video: Out of the Box- Diana+ Fisheye Lens


    We take a look at the Lomography Diana+ and Diana F+ Fisheye Lens.

    Sunday
    May102009

    Video: Shooting with Diana


    Taking photos with your Diana+ is easy.

    Your camera prefers a fast film, so be sure to get film with a rating of ISO 400. ISO is the measure of how sensitive your film is to light. The higher the number, the more sensitive the film is to light.

    Slower films can be used, but you will have to adjust the aperture (Sunny,Semi-cloudy, Cloudy, P) accordingly. This just means, that if you are using a slower film, like ISO 200 or 160, that you use the Semi-cloudy or cloudy aperture when it is sunny out. These apertures have larger openings and will allow more light to hit the film, compensating for the slower film.

    Think SAFE!

    S - Shutter setting. For normal outdoor photos, set the shutter to N.

    A - Aperture setting. Set the aperture to the appropriate symbol, depending out the lighting conditions.
    Sunny
    Semi-Cloudy
    Cloudy
    P (Pinhole) If you accidently have your camera on pinhole, your negatives will be very underexposed using the N shutter setting, so nothing will come out.

    If you are shooting with a slower speed film (ISO 200 or 160), you will need to adjust the aperture accordingly.
    If it is Sunny outside, choose the Semi-Cloudy aperture.
    If it is overcast, choose the Cloudy aperture.

    F - Focus setting. Determine how far you are from your subject and set the lens to the appropriate distance.

    E - Expose your film by tripping the shutter lever.

    Wind the film to the next frame # in the counter window, and repeat.
    Wednesday
    Mar042009

    DIY 35mm for Holga and Diana Cameras


    Here is my procedure for shooting 35mm film in a Diana (vintage or Lomography Diana+) or Holga. This should work for any camera that has a roll film compartment big enough for a 35mm cassette. I have a few older box brownies and folding cameras that use defunct film sizes that I will try this with.

    Unloading the Camera:
    Unloading the camera must be done in absolute darkness. If you don't have a film changing bag (you can get one from BH photo video or Freestyle Photos Supply), you can use a dark room. A windowless bathroom is ideal. Throw a towel across the bottom of the door to block out any stray light.
    Open the camera.
    Remove the 35mm film cassette and rewind the film back into the cassette.
    Take the film to a photo lab and get it processed.
    Tell them you do not want the negatives cut. Give them your 35mm plastic film container to put the film in when they are done. The reason for this is that the negative frames will be unevenly spaced and you will want to trim them so that they fit in a standard 35mm negative page. (also at BH photo or Freestyle).

    You can ask, but they probably won't be able to deal with printing your negatives either, since they will be quite a bit wider than a standard 35mm negative. Even if you are willing to let them crop your image down to a 35mm frame, you will probably also want to include the image around the sprocket holes. Most 1-hour lab equipment won't print these, since it is not part of the normal image area for a 35mm negative.

    If you want the entire negative, including the sprocket holes, your best bet is to get a film scanner. If you are on a budget, and most of us are, look at the Epson V500. The Epson 4490 is also a good choice. It is no longer in production, but if you go to the Epson website, they often have refurbished units for sale.

    Edit: June 5, 2010

    There seems to be some confusion about getting prints from 35mm film shot this way.

    If you are looking for a simple way of getting prints out of your 120 film camera by shooting 35mm film, this isn't it.

    While 35mm film is easier to get processed, the negatives created by shooting them in a 120 film camera are non-standard. Most 1-hour labs can't make prints, unless you don't mind getting parts of the image cropped out. Even so, they may not want to deal with your DIY 35mm film in making prints. They will have to manually set-up each print, because their automated equipment won't work.

    There are labs (usually smaller mom and pop operations or specialty labs.) that can deal with this, but you will have to do the legwork and call or visit them in person to ask.

    The best way of getting easy-to-print 35mm images is to use a 35mm lo-fi camera.